
Pages

Showing posts with label house craziness. Show all posts

Wednesday, June 15, 2016

The new boys room

Sooooo . . . 20 months really flies by, huh! 
Here’s a brief recap of that time: we prepped our house to sell, listed it, sold it in 3 days, moved in with friends, moved across country to our new house.  I was going to do a before/after for the whole house . . . and then got distracted!
We’ve been in this house for almost exactly a year now, and I finally decorated a room!  This time I started with the boys room – it was time for Jelly Bean to finally get out of that crib and into a big boy bed.

Let’s get to the good stuff: the pictures!
Before: (yes, it’s crazy messy. I forgot to retake some after making the kids clean up!)


After! (if I was a professional blogger, the before pictures would probably be crummy, and the afters amazing. But I’m just a casual one, snaping pictures with my phone.  But I cannot even express how happy this room makes me!


Before:


after!


before:


after!


before:

 
after:
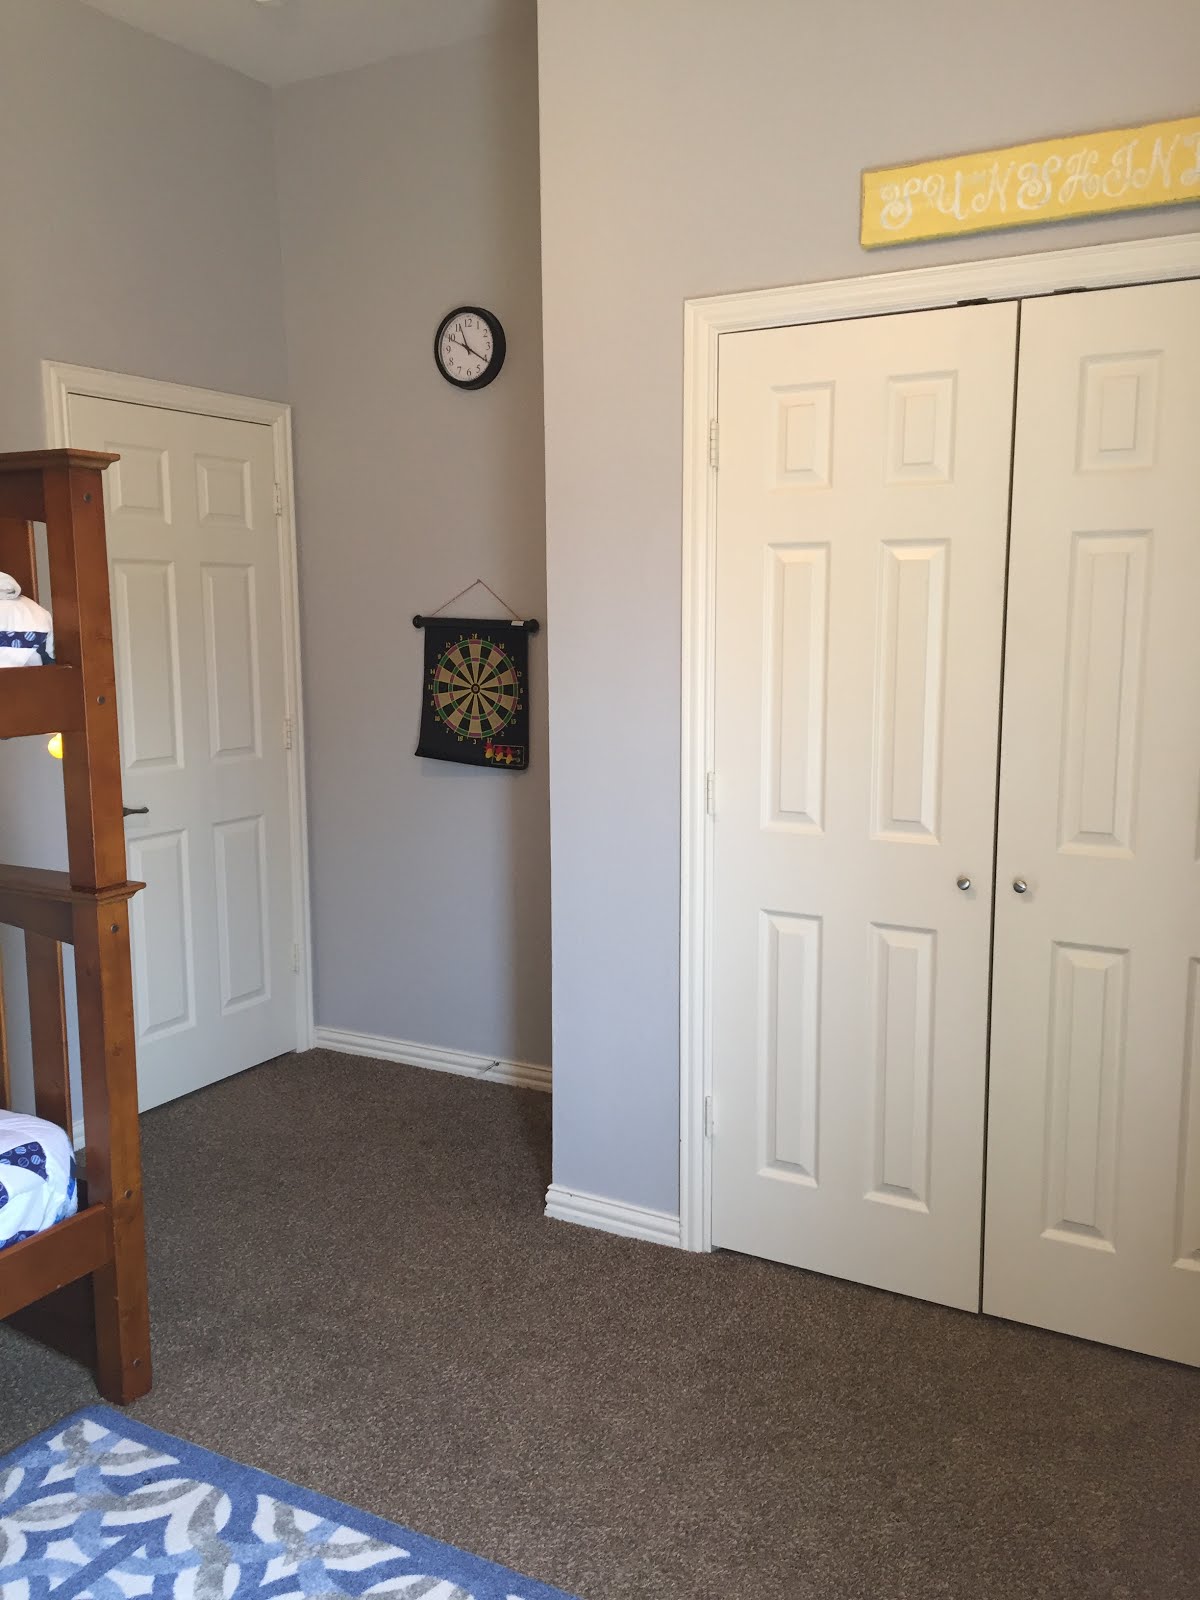


So here’s what I did: painted the whole room Sherwin Williams Repose Gray.
Moved the furniture around so it fit better. Hung up a bunch of stuff.  Sewed a quilt and a pillow(Buddy’s is the same as the last house, I just made a second one for Jelly Bean)  That’s really it.  It took me a year because we didn’t want to go into debt for anything, so it took saving up for a while and then I’d buy one big thing. Or a couple of little ones.

Resource list:

Rug is from Rugs.com

ping pong ball lights: white led strand from Ikea, spray painted cheap ping pong balls, cut a small square out, and hot glued them on.  They are hung with regular nails (top bunk) or command hooks (bottom bunk)

"book" shelves are ikea spice racks (of course!)

Pictures are from pickyourplum.com, frames are the Fiskbo series from ikea.


Magnetic dart board is from bed bath and beyond.


Curtains are from Wayfair.com

I made the “you are my sunshine” sign above the closet door.

magnet boards next to the window were a dollar spot find at target months ago - they were super ugly, but a little paint helped that out!
 

I even attempted a couple of panoramic shots for you: we start at the door to the room, go clockwise around past the closet, window, dressers, bunk bed to end up at the same door.


Friday, September 19, 2014

The start of the world's slowest kitchen remodel

I've wanted to redo my kitchen since we moved it.  Not a full gut or anything, just do some rearranging and a new color scheme.

And we finally got to start it!

Now, this is stage 1 of a 5 stage redo.  (Well, maybe you could call it 2 of 6, with the first one being 3 years ago when I tore off all the  ivy wall paper and repainted!)

So here's the original (from the house listing):


The before (sorry, not quite the same angle, but the best I could find):


here's the during:


And the after!

I know, I know, it looks worse now than before.  But it's a process, remember!

So we took out the two HUGE cabinets (I did the one, by myself, and moved it to by the dining table. That was nuts, but then you already knew I was).  Then we had someone come and plum it for gas, plus run some different electrical for us.  Then my new stove was delivered (fridgidare, gallery series, I'm in LURVE!)  My Hubby and Dad hung up a couple of shelves, just so there's a place to stick the microwave until we get further down the road. 

I'd like to take off the rest of the original wallpaper - in the words of my 9 year old "how did anyone ever think something so ugly was in style!".  And tape/mud the drywall and fix the holes, and at least paint the silly wall.  But we'll see.  It might just have to wait for way down the line!

So here's the steps, and aprox dates for completion at this point.

1. get rid of all the ivy wall paper and paint:  DONE in 2011 ish
2. Remove the giant cabinates and put in a gas stove: DONE aug 2014
3. New floors (wood? sheet vinyl? who knows)  by Christmas/end of Jan ish.
4. 3 new cabinets: one to hang a microwave from, one next to it, and one for next to the stove: spring/summer 2015
5. New countertops: either at the same time, or by Christmas 2015
6. replace backslash, paint, and make it all cute and finished: by spring 2016.

Like I said, the worlds slowest kitchen remodel.  But that's ok - we're doing all of this as we have the money. And it will be great when it's done!

Wednesday, September 17, 2014

This was the worst project I've ever tried.

Let's talk doors, shall we?

I've never liked my front door.  It's old (original to the house, so 50 years old now).  It doesn't fit right (you can see daylight on 3 of the sides, with LOTS of drafts too). And it's kind of ugly.

The previous owners painted it.  It doesn't look that bad from away:

But up close, it was an AWFUL paint job.

I  really want a new one.  But we're considering moving in the next couple of years, and I wondered if I could just get by redoing this one instead.  I thought I'd just strip off that paint and restain it.  Not really that big of a deal, plus I already had everything I needed.

Hahahahahahahahahahahaha - boy oh BOY was I ever wrong!

So here it is, mid stripping:


At this point, I had already spent close to 10 hours on it. I ran through all my stripper in the first coat.  Then I started scraping and discovered that there were NINE different colors of paint on this door.  I scraped and I scraped and I scraped.   As you can see, it was soooo ugly mid point.  One of my problems - I knew my hubby didn't want to do this.  Any big ish project, he just doesn't even want to think about it.  But if I take care of it while he's gone, he's just happy it's over and ok with the results.  And I started this only 36 hours before he came home.  I knew I HAD to get it done before he came back.

I bought more stripper - this time the stuff was supposed to go through 7 layers of paint.  It lied.  But it did get through about 5.  I tried standing it off (nope, my electric sander died instead).  I did everything.  Finally (after close to 20 hours of crazy crazy work), I just decided to give up and spray paint the whole thing. 

Of course, I couldn't get the pins out by myself. So I had to do it in place.  I taped off everything (and used 4 plastic drop cloths to cover the wall, ceiling, and floor all around it.  Then I did 4 coats of spray paint (light, about 30 minutes dry in between) and ended up with this:


I like this door SOOOO Much better now.  Ok, in this shot, it's not completely dry, and WAY not cured.  I left the door open like this all day long for almost a week (only closing/locking it at night). 
 
I'd even say it's awesome, until you look at it closely.  You can see every place that the old paint is still there. There's a ridge each time.  And some stripper got on the door knob, so it's really worn and ugly now.  In fact, it looks downright awful in person, up close.
 
But, BUT - I do like it better.  and it will work until we save up and replace it.  I'm thinking I'll paint the real new door the same color!

Tuesday, April 23, 2013

Keeping it real: redoing my master bedroom

Trying to do a major redo of your bedroom is seriuosly not an easy thing with a 9 month old and a 3 year old around the house all day.  I wanted this room to be done a couple of years ago. Umm yeah, that didn't even get past the drawing board stage.

So ere's a run down of the schedule of this room:

3 years previous: read a million blogs about how to do board and batten.

2 years previous: buy a new bed and bedding. Get paint swatches that you tape on the wall for the next two years.

1 month previous: buy grey samples and paint the top part, just to see how it would work.

Actual start

Day one: Paint store is having a killer sale. Figure you better just do this think already. Go buy the paint. Then buy the wood and rip it into strips at Happy Mom's house.

Day two: Sunday, so just play.

Day three: the "real" work can start!  Um, nope. Hubby gets sick.  Manage to do one coat of primer on the wood and that's it.

Day four (today): Let's try this again . . . Um nope. manage to get the baseboards pried off (that was GROSS under there!). and that's about it.

At this rate I'll be doing the before/after in about 2 months.

Sigh.

But my kids are happy when I play with them.  Maybe, just MAYBE I can do a little painting after they go to bed. But I'm not holding my breath.

Monday, March 5, 2012

The final bathroom, at last!

It’s done, guys! The bathroom is finally done!!*

IMG_8448IMG_8450
IMG_8456
IMG_8469

My big hang ups on getting this finished were the mirror and the hook shelf.  I knew what I wanted, it was getting Hubby to agree to it.  First of all, he hated the mirror I planned on using.  I had an old regular mirror that I was planning on using molding for a frame.  I’ve seen dozens of these, it would have been great!

But Hubby honestly has an aversion to used things. And there was this small scratch in the glass.  I thought we could work around it, but Hubby wouldn’t hear of it.  So we spent a couple of days looking for a suitable replacement.  Finally, we found a clearance mirror at Hobby Lobby for $60. WAY more than my $10 plan, but I did love it.  It was the most beautiful aqua color – I had a very hard time sanding it down!  But I knew the aqua would have clashed horribly, and finally did it.

IMG_8467
If you look close, you can see a bit of that aqua peeking through!

IMG_8462
Hard to see with that light on!

IMG_8463
Now you can see the mirror!

From the first, Hubby hated the idea of hooks. He wanted a regular towel rack.  But we need to hang up 5 towels in this room!  He was sure that my shelf idea would be ugly and obnoxious (he also has a hard time visualizing things before they are finished!).  But when my friend gave me this black shelf for free, I knew it would be perfect!

IMG_8468
If I had a million dollars I would have bought coordinating towels too. But honestly, using what you’ve got is so more my style!

Hubby also has this shave kit that needs to be hung up (along with a hand towel, of course!). I put together a bar style drawer pull on a plaque from hobby lobby, and we were in business!

IMG_8470IMG_8471

Tonight, I finally finished it all.  And did some quick decorating too.  Ever the classy one, and lacking frames, I just taped up the pintables I’m thinking of using!

IMG_8458

This little stool was the cutest spring green – but also would have clashed. So it also got a coat of  white.  I love the idea of a wire basket for the kids bath toys (but not this one. It was a use what you have night!)  However, ‘Lil loves to throw them all into the tub, so I’m looking for a better option!

IMG_8459

Here’s all the nitty gritty details:
Tub: american standard clean artic white, Lowes $300
Faucets: Moen Caldwell, Lowes $220
Tile: Roman stone thru color porcelain in beige, Lowes $255
Decorative stripe: 12x12 mosaic (cut into 3x12 pieces), Lowes $30
Vanity: craigslist, $200
Light: craigslist, $20
Mirror: Hobby Lobby, $60 (clearance)
Fan/light: Harbor Breeze alta, Lowes, $90
Shelf: from neighbor, free
Hooks: hobby lobby, $9
small stool: hobby lobby, $12 (clearance)
large stool: Amazon, $30 (but they sell them at bed bath beyond for a lot cheaper I found out later!)
Little towel bar: drawer pull, Lowes, $8.  Plaque, hobby lobby, $5
Paint: all from Sherwin Williams: Rain drop (walls) $30. Alabaster (trim) $18. Plus ceiling and primer $50
Door: prehung, Lowes, $80
Knob: from Lowes, $20
Shower Curtain: Lowes, $17
Bath mat: Kohls, $20
Printables: (all hotlinked to sources) Gratitude, We Become, Simple Things. Free
Various plumbing, lumber, electrical, etc. $1275

Grand total: $2730.  We went $230 over budget, which actually surprised me. Everything was so much less than what I had thought. . . except that last category.  I had budgeted 600, and it was SO much more than that! Oh well, live and learn!

And because who can resist a great before/after, here you go!
How we first lived with it:

IMG_3203

After my freebie makeover:

IMG_4589

and now!

IMG_8460IMG_8461
*Wow, you actually read clear to the end of my ramblings! Yes, I say this is done, but I know I need to get frames for those quotes, and actually figure out how to decorate in here with stuff that can stay in this room as opposed to stuff I swiped from the rest of the house. And I do want to repaint sometime, and put up crown molding and. . . ! But for now, it’s done!


BWS tips button

HookingupwithHoH


Saturday, February 25, 2012

Bathroom, Day 7

Today, I was the star of the show.

Originally, because we were so far behind, today was going to be tile day and I wasn’t going to paint until everything was finished.  But my smart Dad started thinking, and realized we could work it out this way.

So bright and early, I got started.  With a brand new room, there is A LOT of paint to buy!
I started with a coat of primer on the walls, followed immediately by a coat of ceiling paint.

IMG_8406IMG_8410

That green board is SUPER dark, and I thought I’d be happier with a second coat of primer. So, four hours later, I did that second primer, followed by a second coat on the ceiling.
Four hours later, the color actually went on the walls!

IMG_8412

*Confession: I’m not super happy with the color. Actually, on my screen it looks just the way I wanted to in this shot.  But in person, it’s too baby blue.  I debated between this shade and a different one, and finally went with this one because I thought the other was too gray.  Oops! Well, someday I’ll repaint it!

Four hours after that, I finished with the last coat of paint.  Depending on how you count that, I did 6 coats of paint in one day.  All by myself too!  It was about 5 1/2 hours of painting, but I’m so happy it’s done now, instead of trying to paint around all the tile!

Monday, February 20, 2012

Because Every Remodel Needs a Great Story

Once Upon a Time . . .

There was a crazy woman who wanted to completely gut her bathroom.  Lots and lots and LOTS of planning went into these dreams.  She had a notebook full of ideas and dimensions and prices.  She found a free white toilet.  She saved $400 on a sink.  She knew what tile and lights she wanted.

But she did not have a bath tub.

Her adorable Hubby had a major problem just ordering a tub online. Unless he could see it, measure it, sit in it, he just wasn’t going to do it.

The problem with this? The local stores only carried cheap $100 tubs that had horrific reviews, or super expensive $700+ options with jets.  Neither was acceptable.

After 2 weeks, Hubby finally decided to believe the online reviews and agreed to let her order the perfect $300 tub. 

So she tried. (ok,the third person thing is getting annoying. I’m switching now!) The site wouldn’t let me order the stupid thing!  I tried calling the 800 number. I was told I couldn’t order because there weren’t any tubs in the warehouse, but they might be able to help me at the store.

This was NOT GOOD!  The tub is one of the very first things you put back in a room – it goes in before the walls do!  I proceeded to spend 4 hours online looking for ANY other option (no, I wasn’t the best mommy this day!).  Honestly and truly, there was not a single other tub at any local store that was in our price range that I was willing to put in our new bathroom.

So, 30 minutes before bedtime, I bundled all three kids up and drove to lowes.  The man there told me that yes, it’s true, there aren’t any in the warehouse. But he could call the next day (during normal hours), and find out when they would get some in. 

Hubby’s parents live a couple of hours away. I asked if THAT store had any.  Nope.  There was one store four hours west that had a few, and another store two and a half hours north that had three, but that was it. I asked him to call me the next day and we’d decide then.

With great frustration, I drove home, put the kids to bed, and despaired. If we couldn’t get a tub, how could we even do this remodel? My Dad was flying out, Hubby had 11 days off work, and there wasn’t going to be anything for them to do!

Out of sheer curiosity, I got back online. I changed my store to the city 4 hours away. Nope, couldn’t buy it.  I changed my store to the one 2 1/2 hours away. Still couldn’t buy it, but it came up with a store that was only ONE and a half hours away.  It had 20. TWENTY!!!!!!  Without even consulting Hubby, I whipped out my card and bought the sucker.  Later that night, when he called to wish me good night, I told him what I had done. I worried he’d be bugged, but nope. He was happy that I’d done it.

5 days later, the store called to inform me my tub was ready. After I put the older kids on the bus, I drove ‘Lil to a friends house, and took off (Harry Potter #5 in my cd player to keep me occupied). I drove straight to the store. Two very nice helpful women put the tub in the back of my van, and I drove home. I was gone just over 3 hours total. 

And it was worth every single mile!

IMG_8325

(Can I say I love my van! You can fit a ton of stuff back there!)

Saturday, February 18, 2012

Bathroom remodel, Demo day 2

*I’m condensing almost a month’s worth of work into a few posts. There may be a few clues to how much time has passed, but just know this was NOT a fast process!

So, for a week nothing happened in the bathroom. Then Hubby’s Dad came out and helped him with the rest of the demo. So today’s stuff isn’t too exciting – just some drywall purchased and some more destruction!

IMG_8387

IMG_8388

Ok, so dangling electrical work in the middle of a hallway isn’t the safest thing around! But that should change in a few more days!

IMG_8389

Blogging tips