Pages

Monday, March 28, 2011

The door that just may save my sanity

Or at the very least my clothes!

My house has two bathrooms. Two small bathrooms. I've talked about the upstairs one before, but never really the downstairs bathroom.

MY bathroom.

That's where I shower, do my hair, keep my supplies. Of course other people use the facilities, but I'm the only one that showers there. (I can't find the pictures from when we moved in. But suffice it to say, it was the cutest room in the house.)

The worst part about my bathroom is the lack of counter space. As in - THERE FREAKIN ISN'T ANY!!!

The only place to put clothes for showers is the back of the toilet. I've dropped more than one shirt into the open toilet after showering.

My hand mirror is melted and twisted from being too close to my curling iron in the sink. Yes the sink. It's the only place to put brushes, mirrors, irons, and blow dryers - usually all at the same time.
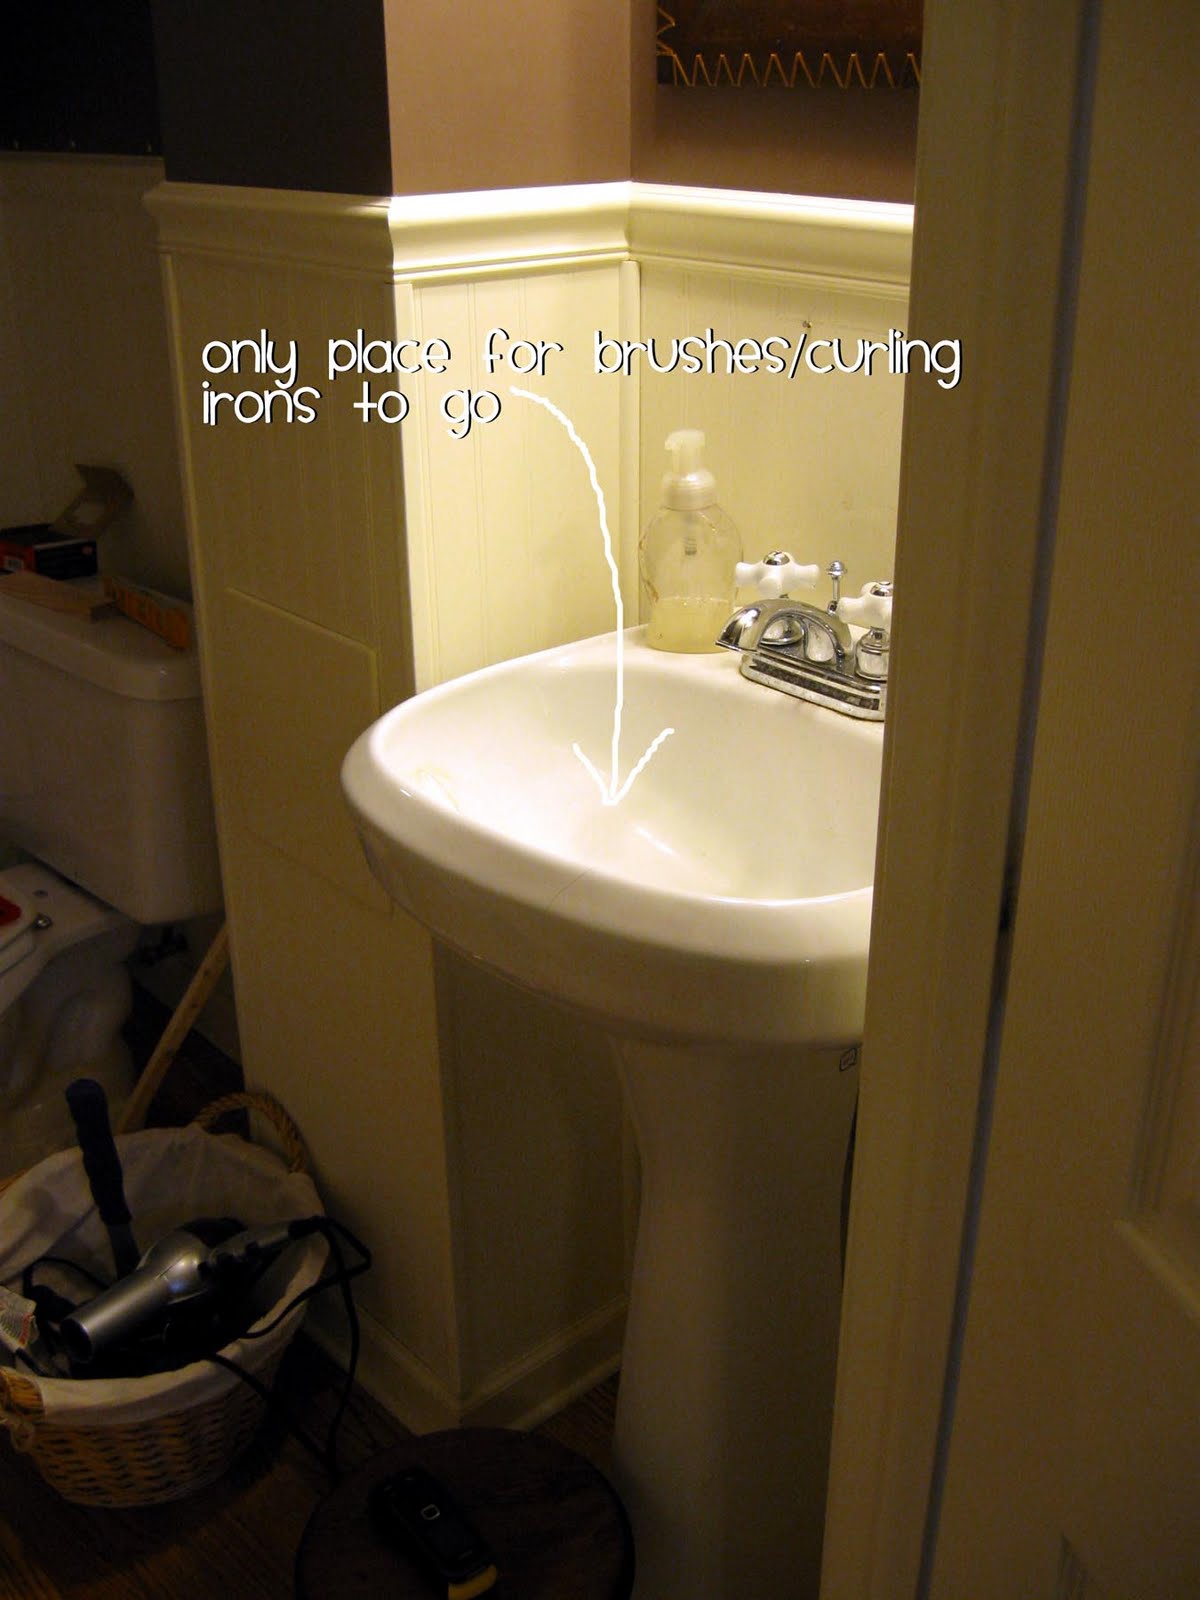
So I've been looking for a solution.

Happy Mom and I are trying to get together every 3 months or so and have a sister craft day. Our first one was Thursday (which was quite the adventure). We had several ideas for what to craft, but ultimately decided on making some shelves using this tutorial. The best part about it - Happy Mom did this a few years ago. Which meant she already had the doors (FREE!) and they were cut in half already (no scary table saw!) The worst part about this craft was not measuring right (GRRRR!), and I had nothing to show when I left her house. But it's all good!

We did change the instructions just a bit. Happy Mom's previous shelf tends to lean down in the front. So we added side cleats to help with some stability. On a door, there's a thick piece of wood at the top/bottom. Since I couldn't drill through that, I put one cleat out from the wall that it will just slide over (kind of like these plans)

How I assembled: I predrilled some holes in my cleats (the wood that goes on the wall). Then I put the wood on the wall and drilled the same holes again. I took the wood off and TADA!! now new where to put in my drywall anchors!

Then screw those puppies in!


You do need to dig out a bunch of cardboard from your door (did you know that's what is in there?)
Once your door is painted and dry, you can put it on the wall!*


I also screwed it to the cleats in the two corners (so no little people try to climb up and fall to their doom)

Then slap up some junk from around the house (which will never stay there!) to stage it


and you're done!

And look! it's even level!

My sink dilemma was even easier. I found a little shelf at a thrift store, and just nailed it to the bead board.(I'd been trying to come up with something to go between the chair rail and the mirror. This was a heck of a lot easier!)

Hooray for organization!

*Moment of honesty: I put my shelf too close to the chair rail. So it didn't fit. I had to unscrew everything, dig out the anchors, and move the whole thing 1/2 inch higher. Some days projects are just crazy!

LINKED HERE

Friday, March 25, 2011

Laree and the no good rotten very bad day

Some days disappearing to Australia really does sound rather nice.

To start off, 'Lil woke up twice screaming last night. To be fair, the first time she'd managed to soak clear through everything, but changing everything in the middle of the night doesn't make waking up in the morning any easier. And then she woke up for real at 6:30, which my body did not agree with. (apparently, it didn't agree with my alarm either. My alarm failed to go off at 5:51, so I didn't get to exercise today too).

Then I had a boy who could not cope with ANY trial today. There were 3 episodes of running away sobbing just before breakfast was over.

And it snowed today, which made everyone cranky.

And my Valspar paint sample - which I've been trying to get on Facebook for weeks now - finally came. And instead of the pretty soft green I thought I clicked on, I got neon grass green. Which after attempting to mix with other paint colors at my house, the best I was able to come up with was a dingy forest green.

So a trip to the store was in order. And while I got a better sample color mixed, I had a crazy hard time finding almost everything else on my list.

And then I forgot to go to the two other stores I've needed to go to for a week.

When we got home, everyone was starving. And my house looks like a giant picked it up, spun it around twelve times, and then tossed it back down.

But I finally got everyone settled and attempted to sample paint my kitchen. The color I love; the paint not so much. So I'm going to have to try to get a different brand of paint tinted to just the right color to match (yuck!)

And my baby has learned to sob whenever she can't get her own way, so my head has been pounding all day.

And then I tried to hang up my new shelf - which I somehow made yesterday at Happy Mom's house (in between helping her clean, cook 1495 things, and play with all the company she had). This super cool shelf . . . I measured wrong. And it's 1/4 and inch too big to fit on my wall.

So I finally FINALLY got a minute to myself to check emails. And kohls is having this great sale and I find this awesome bedding that I love to try for my new bed. (yup, I got a new bed. It's awesome, but I haven't blogged about it 'cause it looks really stupid with my deader-than-dead bedspread on it. And I tried to get a new one online, but when it came it looked really REALLY stupid, so I had to send it back and I haven't been able to find anything better until today that didn't cost an arm and a leg).

And instead of telling you everything I tried to do in the next 90 minutes, lets just say kohls didn't have it at their store, their charge cards are stupid, and since my house is 45 years old, I'm pretty sure my city and zip code are right, no matter what their data base says, and no I don't want to take a phone survey about it!

And I forgot AGAIN to go to those two stores I've needed to for a week.

And the bread I was making for dinner rose too long so it's going to taste funny.

And I seriously SERIOUSLY wish it was just bedtime right now so this no good rotten very bad day could just be done!!!!

2.5 hours and counting. Anyone know a good movie about Australia?

Saturday, March 12, 2011

Jewelry illiterate

In all my crafty endeavors, one area I've never really delved into is jewelry making. I love looking at pretty jewelry, but I don't really wear it too much. I don't want to spend much money on something my baby is just going to chew on.

But I do love entering contests for pretty things. I admire all the wonderful etsy shops full of creative necklaces, bracelets, and rings.

Today I entered that fray - just a tiny bit.

See, I have this watch:

I got it on clearance a couple of years ago, and I love it. The cute flowers, the neutrals - it just makes me happy. I don't wear it very much (since having kids I've gotten out of that habit), but it lives in my church bag and saved me more than once when I taught primary.

Two weeks ago, I pulled it out, and actually started wearing it again. I wanted to get back in the habit of being a watch person. The next day, it broke.

I guess that's why I stopped wearing watches! But I wanted to still wear it. I wasn't sure what to do, until I saw this post. Yes, I realize that an adorable St Patty's day necklace doesn't have much to do with a watch band, but she introduced me to crimp beads. I've never used - or even heard of - them before. But I knew it would be a huge help in my band endeavors.

I headed off to Joann's. $6.74 later, I had these:

(I did have a 50% coupon for the beads)

My before and after isn't very hard to accomplish. I cut off the leather band. Then I looped the elastic string over the remaining post. I added a crimp bead, strung on some pretty beads, and finished off the other end the same way.

But I have a pretty band now. And a watch I can actually wear.

*You want to make your loop as small as possible so the band doesn't slide around too much!

linking here!

Thursday, March 10, 2011

Scherenschnitte and other new vocab words.

(yes, I want to say bless you after that title too!)

SO I should be packing for a fabulous trip to see some family tomorrow. But, since the plane is now full, we aren't leaving until Monday. So instead I thought I'd kill some time on the computer.

'Lil has Roseola. It's one of those diseases that I've heard about, but never really thought about before. I had no idea she had it until last night, when she broke out in this weird rash all over her body.

On the plus side, I know why she had a pushing 105 fever for a couple of days. And, once the rash shows up, they aren't contagious, and are pretty much over it. And since there isn't a thing a doctor could do for it, it's really ok that I never took her in.

A few months ago, I learned about scherenschnitte from this site. Her work is amazing! (even more amazing, check this place out!) Scherenschnitte is basically German for really REALLY fancy paper cutting. I love that she posts free templates. She does it all with an exacto knife. I prefer to let my silhouette do the work!

(this was totally Happy Mom's b-day present. The first one was cuter - with blue paper. But it was too big for the frame.
So she got the less cute cream paper instead!)


My son is currently declaring every toy in the room as a "bad guy." This of course means that he then gets to knock them over and make strange sounds. Listening to boys play is always interesting!

Thursday, March 3, 2011

A project 3 years in the making

*Those of you joining this party from a linky: I ramble A LOT! Keep on scrolling, you'll get to the good stuff soon!

Back when I still lived in Euless, I came up with a couple of different growth chart ideas. I wanted it to be on a board so we could take it with us. I had great intentions of adorableness - a personalized for each child. But I never worked on a single one. I never even bought a board to start. I just dreamed.

When I was drooling over getting a Silhouette SD, I entered a couple dozen contests to win one. Every contest was the same format "go to the website, look around, then come back and tell me what you'd make first if you win!" After about the third contest, I stopped going to the website (I had it MEMORIZED by that point!), and would just say that I wanted to make a growth chart for my kiddos.

When I got my silhouette, I had great intentions of whipping out a growth chart. It even came with vinyl!

Then I opened the box. And realized that it came with cream vinyl. Which really only looks good on darker paints. Which is totally not conducive to a growth chart.

So I had to order black vinyl. And wait for it to come. Once it did, of COURSE I had to let it sit on my counter for three weeks before I got around do doing anything about it!

Once I finally sat down to make it, I had to come up with something for the top, which of course took another week or two. Then I had to actually cut the vinyl. And paint the board. And . . .

Anyway, it's finally done. And I love it!

First off, some fun pictures of the end result:


I wanted to have it go up to about 6 ft 4 and then the art work. But my ceiling height did not cooperate.
Instead I cut off about 7 inches from the bottom - who needs the bottom foot anyway! I plan on putting in everyone's birth height, just for extra cuteness!

It's screwed straight into the wall (with drywall anchors to please my hubby), so it's not going anywhere.

Want to make one of your own? Keep on reading! If not - just scroll through and fall in love with the pictures! (or go make cookies - whichever will make you happiest!)

Step One: grab a board. Mine is a 1x6x6, and set me back about $5. In hindsight, I kind of wish I would have gone for the 1x8, so choose wisely. Go ahead and paint it your desired color now.

Step TWO: if you have a Silhouette, you can use this jpg to take out a lot of the hassle.

Step Three: Get the file ready to cut.

Yes, I do realize that I left out the actual cute part. Here's the scoop. I did a lot of searching to come up with that idea. And I mean A LOT!! I finally found it at a digital scrap booking store. Yes, I could have just stolen the idea and done it myself. But that didn't feel exactly honest, and it was worth $2.67 for my integrity. So you can feel good about yourself too, pick it up here.

You back? Great! Ok, so the size of the GROW png is totally wrong. So here's what you do.

First open up the Silhouette Studio. Then go to file>open. Change the file type (at the bottom) to all files, and find your .png grow file. This is what your screen should look like:


First I re-sized it a bit, so it was taller (2.945 x 7.075 to be exact!) Then, to change it into a cut file, grab your trace button (right hand side, 5th from the right.) click on "select trace area", and drag a box around the shape. Your screen should look like this:


Uncheck the high pass filter box. I also changed the threshold to 86% (this helps to get all those little lines in)
Now click "Trace".


Hooray! You did it! You can get rid of the black copy - it won't do anything from here on out.

Now let's size it.

Right now, it's one giant element. We need it separate. So select the whole thing, then Then you need to release the compound path (I do Object>release compound path).


Now we've got a whole bunch of little elements. You'll want to go and make the following compound paths:
  • the letters g and r with the two circles in the letter g
  • the word "verb."
  • the words "to increase"
  • "in size"
  • "or substance."
Sometimes it hard to know if you got all the little parts selected. I make it a compound path, then move it around. If all the word moves, just hit "undo" so it moves back to the right part and go on. If you missed something, hit undo so it goes back and then select the part you missed.


Now play with the spacing and size until you're happy. My final sizes were as follows:
  • the outer box (included in the .jpg earlier) is 3.115 x 5.165
  • The gr()w portion is 2.220 x 4.565
  • the definition is 1.465 x 1.325
You'll want the definition to be as large as you can. This helps a TON with cutting out. I eventually made just the definition one compound path (more on why in a minute).

Step Four: Cut it out!

This is where I had some problems. My vinyl wanted to curl up and then letters were getting sliced in half. Eventually, I moved the speed clear down to one and the thickness up to 10. This helped, but didn't solve it. So I cut out just the definition portion 5 or 6 times, and was able to piece it together into one end result.

Step Five: Weed it!

Weeding is removing all the vinyl you don't need. DO NOT DO ANYTHING TO THE TINY LETTERS. Just cut them out and set them aside.
This is key to my cool step.

Step 6: Put on transfer tape - but NOT on the tiny letters.

Step 7: put the vinyl on your board. This is obvious for the regular stuff.


Now, for the little words. First weed out the centers of the letters.

Do not remove any of the other vinyl. Remove all the vinyl together from the backing.

Place on your board and rub to make the whole thing stick. Now peel off the extra vinyl.

This is the only way I was able to get all the little things to stay in line!

Tada! Now it's all there, and you didn't scream in frustration at all those tiny letters moving around and making a mess while you're weeding. (not that I'd know anything about that, all FREAKIN SEVEN TIMES I DID IT!!)

I'm a Link'n up here!

Wednesday, March 2, 2011

Places I like to link up to


BWS tips button


HookingupwithHoH


had to share

I really am working on posting a fab tutorial, but I had to share this. My daughter just got a pretzel rod stuck in her mouth.

My 13 month old daughter.

Stuck like you'd prop open that man eating crocodile to save your life.

it was freakin' hilarious!


*She's totally fine. It's not like she was eating unobserved or anything. She just bit off enough to make it the wrong size, then wedged it in there. At least, I sure thought it was funny!
Blogging tips