This one has been crazy to get done! But after 60 bajillion trips to the store, dozens of setbacks, and several glue gun burns, I'm ready to post!
A couple of years ago I saw this birthday calendar at my nieces' place. I love the idea of having all my family's birthdays in one place. And this was such an adorable idea. I filed the idea away, and have been looking for the right frame since. I finally found one.
Supplies:
a big frame. The opening on mine measures 19.5 x 9.5 You want a frame that is decidedly longer one direction.
Jute. A LOT of jute. I needed about 100 feet for this.
Mini clothespins (1 3/4 inches long). I found mine at joanns.
Ribbon, about 4 yards worth.
1/4 yard cute fabric
Full sheet clear address labels (like these ones)
Start off with your frame.
 Take out the glass and whatever old picture is inside. Save the cardboard back for later. Use some needle nose pliers to pull out all the little tabby things that hold it all together.
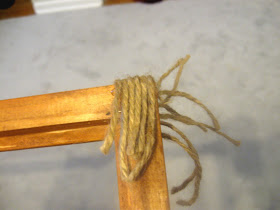
Now get ready to wrap! Ok, so you could just paint it. Or leave it the way it is. But I wanted something different. Start with the corners. It took some figuring out, but his is the way that worked for me. Cut 6 or 7 -3inch strands. Glue onto the left side of the corner and let the ends hang out over the end of the frame - like this.
 Shoot. Blogger won't turn the picture the right way. But you get the idea, right?
Now take 6 or 7 more 3 inch strands. Glue them the opposite way and also let them hang out over the end.
 Fold the strands over to the back and glue down. One side:
And then the other:
 Trim up the ends so it looks all neat.
Repeat for the other 3 corners.
 Now take your jute, get cozy with a good movie and start wrapping. I tied a loop with a knot to start out, and just patiently wrapped up the whole thing.
 Whew! We made it! Now take the cardboard back and cover it with your cute fabric. DON'T cut your cardboard smaller. It will fit. (not that I'd know that from experience or anything!)
Grab your ribbon, and cut 12 pieces your needed length (just hold it up to your frame and measure it.)
Ready to work your 7th grade algebra class? Measure the length of your frame. Divide this by 13. Cut a scrap of cardboard (or something else stiff) EXACTLY this width. Mark (on the BACK!!) 12 dots along the back of your frame. *if you measure wrong, grab a different color of marker from your kid's stash and try it again. I only had 4 colors on mine!
Repeat on the bottom of the frame. (Still on the BACK, right?)
 Grab your glue gun. Squirt a dab on each dot and stick your ribbon on.
 Pulling VERRRRRRY tight, repeat on the other end.
The tighter you pull it, the better it will lay later.
Glue your fabric covered cardboard onto the frame. Cut about an 18 inch piece of ribbon and sew it onto your frame. Do not try to use your glue gun. There is a distinct chance that the glue will give out, make the frame fall, break your clothespins, and rip the month ribbons off too. (Not that I'd know anything about that either . . .!)

 I used my favorite word processing program to type up my words. The name of the font is My Own Topher. The months are size 24, "Cake Time!" is size 52, and the names are size 9. Make sure you print it out on regular paper first to check for sizing. Then print it out on your full sheet labels. Cut them out, stick them on the appropriate place, and step back to enjoy your craftiness!

 Cost breakdown
Frame: $3
Jute: $1.50
Ribbon: $4
Fabric: $1
Clothes pins: $2.50
Labels: 10 for $12, so $1.20
TOTAL: $13.20

Very cute! But what about Dad? Doesn't he get a birthday too? I mean, I know he's old, but not remembering his birthday won't stop him from getting older. :)
ReplyDeleteIt's hard to read the names, so maybe Paily is right; but I thought you had Grandpa and Grandma mixed up someway. I tried to call you about something else couldn't get through. If you have a chance, give me a call.
ReplyDelete